FAQ – Lite Dispatch App
The first step is to set up the user name and password used for communicating with the back-end (www.litedispatch.com). The administrator has to create the user with a unique email address and a password in order to allow the mobile user to get data and updates from the back-end application.
Once the email address and the password are set on the back-end and communicated to the mobile user, he should add them in the section of the mobile application and test the validity of them with the back-end server. He should press the button in the settings to confirm communication with the back-end.
The section in app menu selection is very important for the features enabled in the app.
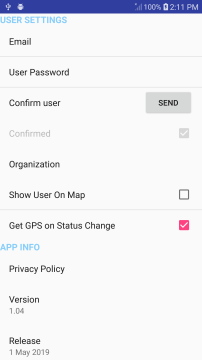
- Email - is the email address associated with the user and has to be set up first on the back-end
- User Password - like above is used to allow communication with the back-end. The whole communication between app and back-end is encrypted. As a side note to the mobile app, all data stored by the app is also encrypted on the mobile device and cannot be used by any outside app.
- Confirm user - is a button that once pressed will show if the user is allowed to communicate with the back-end
- Organization - is the name set by the organization and received with the communication confirmation
- Show User On Map - if selected will show the user on map as well as the jobs
- Get GPS on Status Change - in the
screen, whenever there is a status change the app will attach also the GPS location. It can be used to show the locations the user has been once the status changed.
The user gets the jobs once they are created on the back-end if they are for the current working day. Another method is the press the bottom bar icon .
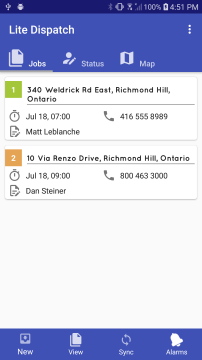
In order to open a job and change its status just touch the bottom part of the entry in the main screen. The screen look like the one below:
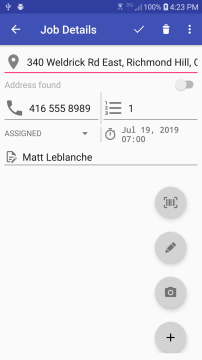 The user can change all the data regarding the job including address, phone number, order, and the status of the job. If the switch is off, by changing it the application will find the coordinates or an error will pop-up on the
 screen.
From this screen the user can jump to the Map screen by touching the  icon.
Also the user can message/call the job owner by touching the
icon.
Also the user can message/call the job owner by touching the  icon.
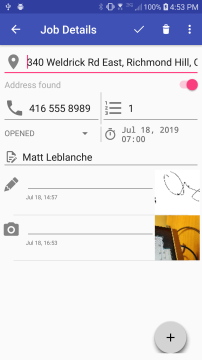
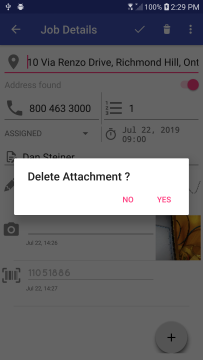
There are three possible type of documents attached to each job - pictures, signature captures and bar codes. An example of job with documents is shown in the picture.
icon.
There are three possible type of documents attached to each job - pictures, signature captures and bar codes. An example of job with documents is shown in the picture.
The user can change all the data regarding the job including address, phone number, order, and the status of the job. If the switch is off, by changing it the application will find the coordinates or an error will pop-up on the
If one of the attachments (pictures/sigantures/bar codes) are to be deleted the user has to touch the icons on the left side of the entry and press in the open dialog box.
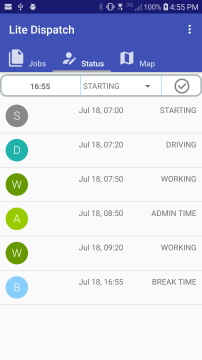
The user status could be used to understand the time management for the workforce. The screen has a header with three parts - time, status and the button for adding or deleting status.
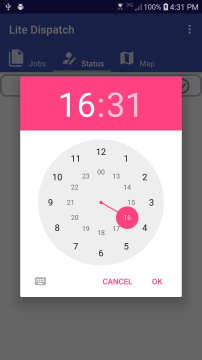
Each cycle should start with setting the time, set the status and accepting the creation of the time slot. There are seven type of working status:
 A normal working day should have the same number of working periods as the number of jobs assigned to the user.
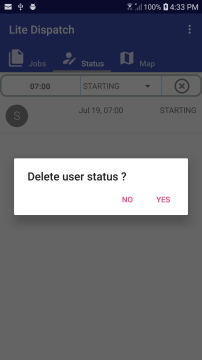
 If the user wants to delete one of the working statuses, he/she has to long press the entry in the list and then the button on the left will change from
  to
to  to delete the chosen entry.
- starting/ending are the delimiters used for each working day
- resting is for cases when the user has to take time-off
- break-time is the lunch/break time
- admin time is allocated when the user has to do administrative work
- working - productive time
A normal working day should have the same number of working periods as the number of jobs assigned to the user.
If the user wants to delete one of the working statuses, he/she has to long press the entry in the list and then the button on the left will change from
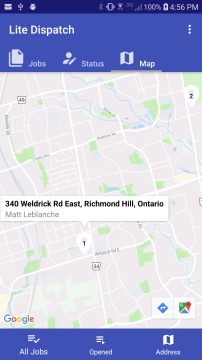
The Map screen is showing the jobs filtered by status, the current user location and can help with locating an address on map. Each job is identified by its order number and pressing the icon will display the address and will open and optional window to get direction, time and the routes from the current position. For the routing to be available, the phone has to enable GPS location services.

On the main screen pressing the button will synchronize the local jobs and user status transitions to the back-end. Any errors of the synchronization process will be visible in the Notifications screen.
On the main screen pressing the Alarms button will open the Notifications window which displays any errors of the application for the current day:
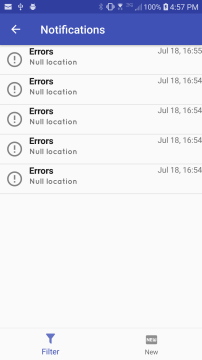
- communication errors
- local errors with the app
- user status without GPS location (if it was set as such)